Setting Up and Executing LTS Simulations
After the LTS model has been set-up according the previous steps, the LTS simulation itself must be set-up and executed.
Several alternative workflows for running LTS simulations are available. These are described and commented in the following.
"Classic" LTS workflow
Running LTS simulation in a "Classic" LTS workflow includes three steps as described and illustrated below.
- STEP 1: Running runoff and catchment discharge (optional) simulation. This a "normal" catchment simulation, except that it runs over long historical periods.
- Rainfall boundary condition(s) and, optionally, evapo-transpiration, temperature and SWQ boundary condition(s) must be specified for the entire simulation period and activated.
- Catchment discharge boundary condition(s) (optional dry weather flow) must be specified for entire simulation period and activated.
- Set-up a catchment simulation with runoff and catchment discharge (optional) included. Simulation must include at least the period to be included in the LTS simulation.
- Define adequate simulation time step for runoff and catchment discharge simulations
- Result files for runoff and catchment discharge shall be included in the simulation. They must include results for all catchments, saved with the frequency enough to resolve the simulated dynamics. For surface runoff, saving frequency is typically 60-300 seconds, for RDI 1- 12 hours and for catchment discharge 1 hour.
- Start the catchment model simulation by pressing "RUN"
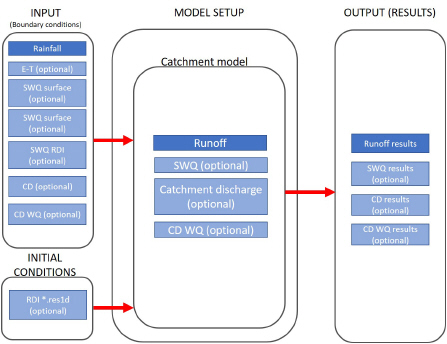
Figure: "Classic" workflow - STEP1
- STEP 2: Create job list
- Set-up a network simulation and include LTS. The simulation period shall extend over the wanted historical period (inside the available rainfall boundary data).
- Create and activate boundary conditions of the type "inflow from file" with simulated runoff and catchment discharge
- In the HD tab of the simulation setup editor define the network model simulation time step. Make sure that the specified time step is adequate for the actual model
- In the LTS tab of the simulation setup editor press "create job list" button. This will initiate the job list creation process. A job list file *.jlf will be created in the actual project directory. The file's name includes the actual simulation job name.
- Upon completed job list creation, load the job list file into the simulation setup by opening the file browser (…) and picking the *.jlf file. Open the file to review and (optionally) manually modify its contents (e.g. change time step for some known extreme event). Make sure that all included boundary conditions are OK. Pay attention to the reported overall number of simulation jobs (event) and total duration of the simulation. If this deviate significantly from expectation, review and modify the job list criteria and repeat job list creation. Finally, close and save (optionally) the *.jlf file.
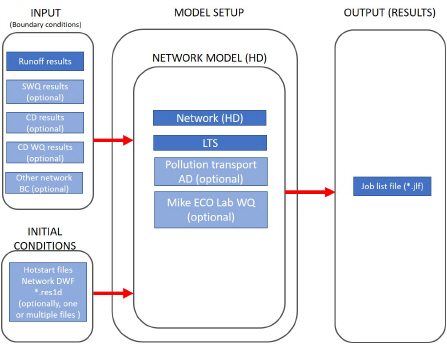
Figure: "Classic" workflow - STEP2
- STEP 3: Running LTS network simulation
- Include the wanted output files in the simulation setup. All LTS outputs (except ASCII version for computed statistics *.ERF) are optional. The output will typically include LTS extreme statistics and LTS chronological statistics. LTS continuous output and "standard" network result files may be added if such outputs are wanted.
- Start the network LTS simulation by pressing "RUN". Depending on the size of the model, length of the simulation period, number of specified statistics and the available hardware, this simulation may take a long time.
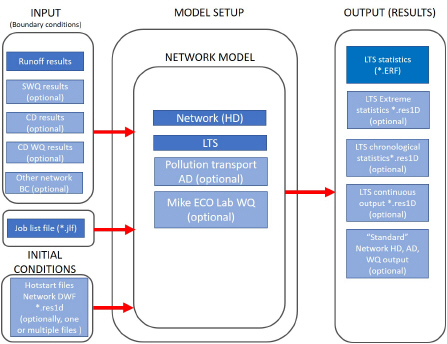
Figure: "Classic" workflow - STEP3
Disadvantage of this workflow is its inefficiency and generation of large intermediate result files (runoff and catchment discharge) with the sole purpose to provide input to the network LTS simulation.
Integrated 2-step LTS workflow
This workflow includes two steps as described and illustrated below.
- STEP 1: Create job list "on the fly" i.e. simultaneously with runoff and catchment discharge simulations
- Set-up an integrated catchment &network simulation, including runoff and catchment discharge, as well as LTS. The simulation period shall extend over the wanted historical period (inside the available rainfall boundary data).
- Define adequate simulation time step for runoff and catchment discharge simulations
- In the HD tab of the simulation setup editor define the network model simulation time step. Make sure that the specified time step is adequate for the actual model
- Rainfall boundary condition(s) and, optionally, evapotranspiration, temperature and SWQ boundary condition(s) must be specified for the entire simulation period and activated.
- Catchment discharge boundary condition(s) (if dry weather flow included) must be specified for entire simulation period and activated.
- Any existing network boundary condition (inflow from file) representing runoff and/or catchment discharge shall be de-activated or removed.
- No result files should be specified, as we want to avoid large intermediate result files. However, if wanted, result files for runoff and catchment discharge can be included in the simulation.
- In the LTS tab of the simulation setup editor press "create job list" button. This will initiate the job list creation process. A job list file *.jlf will be created in the actual project directory. The file's name includes the actual simulation job name.
- Upon completed job list creation, load the job lit file into the simulation setup by opening the file browser (…) and picking the *.jlf file. Open the file to review and (optionally) manually modify its contents. Make sure that all included boundary conditions are ok. Pay attention to the reported overall number of simulation jobs (event) and total duration of the simulation. If these outcome deviates significantly from expectation, review and modify the job list criteria and repeat job list creation. Finally, close and save (optionally) the *.jlf file.
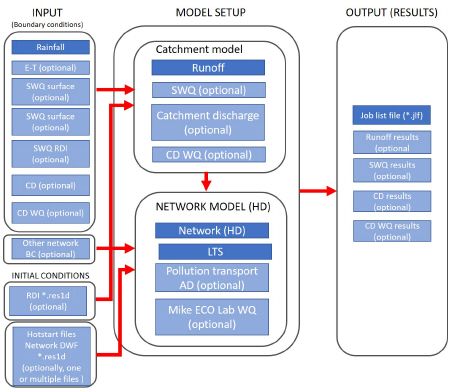
Figure: 2-step integrated simulation workflow - STEP1
- STEP 2: Running integrated LTS catchment and network simulation
- Include the wanted output files in the simulation setup. These will typically include LTS extreme statistics and LTS chronological statistics. Optionally, LTS continuous output and "standard" network result files may be added.
- Start the integrated catchment and network LTS simulation by pressing "RUN". Depending on the size of the model, length of the simulation period, number of specified statistics and the available hardware, this simulation may take a long time.
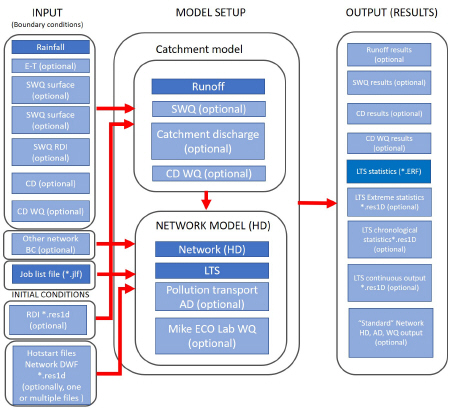
Figure: 2-step integrated simulation workflow - STEP2
Advantage of this LTS workflow is its relative simplicity and avoiding creation of large runoff and catchment discharge result files.
Integrated simulation single step LTS workflow
This workflow executes the LTS simulation in a single step as follows:
- Set-up an integrated catchment &network simulation, including runoff and catchment discharge, as well as LTS. The simulation period shall extend over the wanted historical period (inside the available rainfall boundary data).
- In the "Catchments" tab of the simulation editor, define adequate simulation time step for runoff and catchment discharge simulations
- In the "HD" tab of the simulation setup editor define the network model simulation time step. Make sure that the specified time step is adequate for the actual model
- In the "LTS" tab of the simulation setup editor, make sure that the job list file field is empty.
- Rainfall boundary condition(s) and, optionally, evapotranspiration and temperature boundary condition(s) must be specified for the entire simulation period and activated.
- Catchment discharge boundary condition(s) (dry weather flow) must be specified for entire simulation period and activated.
- Any network boundary condition (inflow from file) representing runoff and/or catchment discharge shall be ad-activated or removed.
- Include the wanted LTS output files in the simulation setup. These will typically include LTS extreme statistics and LTS chronological statistics. Optionally, LTS continuous output and "standard" network result files may be added
- No result files for the runoff and catchment discharge models should be specified. However, if wanted, result files for runoff and catchment discharge can be included in the simulation.
- Start the integrated catchment and network LTS simulation by pressing "RUN". Starting an LTS simulation without specified job list file, will trigger the single-step LTS simulation. Depending on the size of the model, length of the simulation period, number of specified statistics and the available hardware, this simulation may take a long time. This simulation will create a job list "on the fly" and apply it for the LTS network simulation.
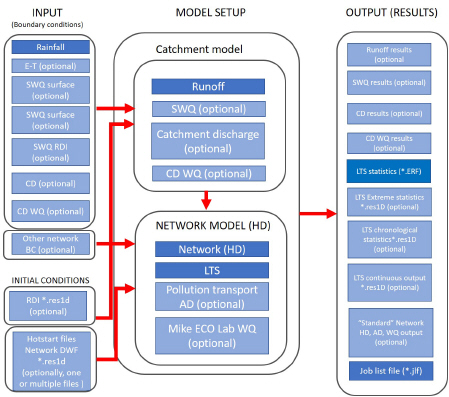
Figure: Single step integrated simulation workflow - STEP2
This workflow is the simplest and most efficient. Disadvantage is that it does not allow for review and optional editing of the job list file. Therefore, it is recommended for relatively simple LTS setups or for repeated LTS simulation with minor modifications of the LTS setup.