Data Flagging
Introduction to MIKE+ Data Flags
MIKE+ provides the ability to track your data in a very flexible way. The tracking is done by assigning user defined 'flags' (status codes) to the data. A user has complete control of how many flags are used, the purpose and associated values.
What are flags?
Flags (Status Codes) are additional data attributes in the database that can be set to an integer value with a user defined meaning, useful for quality assurance, filtering and interrogation of the model. "Status Codes" is an internal table that maintains a customized list of internal values and corresponding names. Typically, when viewed within the user interface, names rather than integer values will be visible to the user.
What can be flagged?
Status codes can be assigned in all tables representing the physical model (i.e. pipes, manholes, nodes, pumps, catchments etc.). Status codes can be defined at two levels:
- Record level: This type of flag can be assigned to a record in a table. E.g. a node. A typical use could be to keep track of the data source or a status. The database field ID for this type of flag is 'Element_S'.
- Attribute level: The physical attributes of the model elements such as diameter, sizes or levels can have flags defined for individual attributes within a table record. These flags are typically useful for tracking data manipulation and editing operation. The database fields containing these flags contain a suffix "_S". For example, the "Diameter_S" field contains the corresponding flag to Diameter.
Defining Status Codes
MIKE+ comes with a set of predefined values which can be accessed in a model component table via the "Description" tab, "Status" drop-down list.
This default list of status codes can then be extended to include codes more relevant to your workflow. For example, "Surveyed 01/01/2019". Code numbers do not have be consecutive but must be unique.
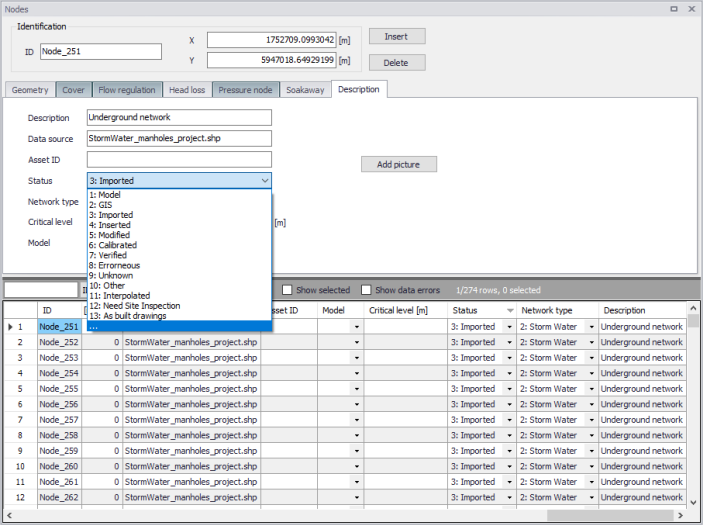
Figure: Customising status codes
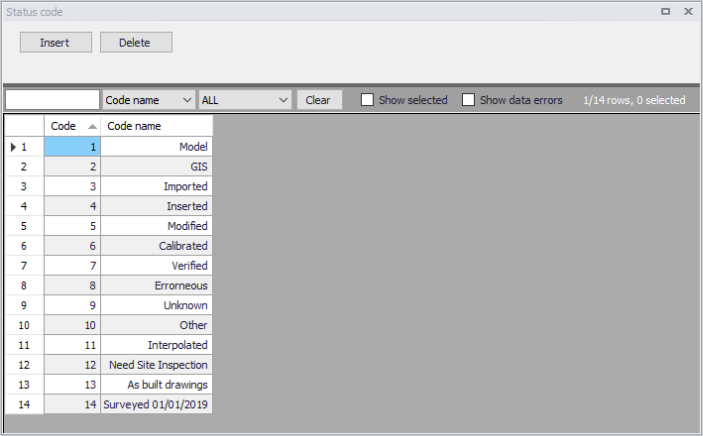
Figure: Defining status codes
While the underlying database uses the code values (integer), the code names (text) are visible in the MIKE+ graphical user interface. When using the field calculator the integer code value is expected or when accessing the database outside of the MIKE+ interface (ArcGIS, SQLite/PostGIS) only the code value is available.
Setting a Flag
The default value for all flags is 'null'. The value for a flag may be set by one of several methods:
During Import
Setting a flag value during an import is the easiest way to track the data source in cases where there are multiple data sources. This is done in the assignment specification as presented in the figure below. where the record level flag is set to have a code value of 1 (Element_S = 1). The code value must correspond to the integer value of the status code, rather than the code name.
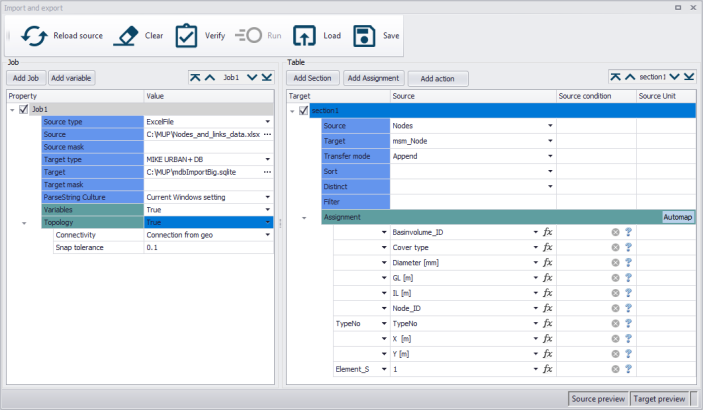
Figure: Setting the flags when importing data
If your source database has a tracking/flagging field defined, this can be imported using the source data field ID and utilised to keep the two databases synchronised. Refer to the example in the figure below where "Diameter_S" is set to equal "Data_source".
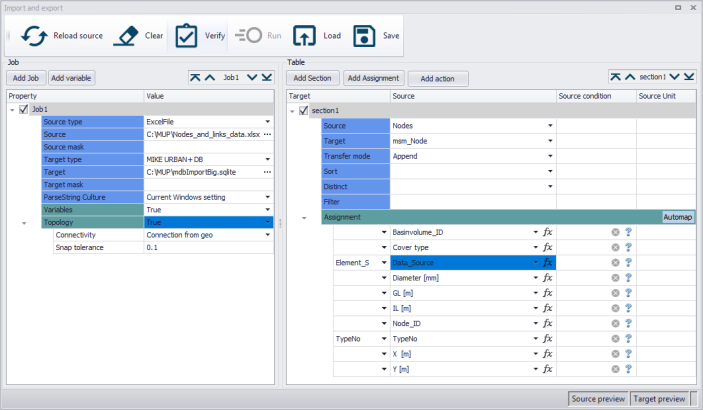
Figure: Importing flags from external source
Assigning Flags with Bulk Editing Tools
Several of the tools in MIKE+ that modify data en masse will offer to flag the affected records and attributes. By selecting the desired status code when prompted by the tool, the data updated in that session will be flagged, enabling further filtering, processing, checks or tracking.
As an example, the assignment tool is often used to fill data gaps. The figure below shows how to flag all affected node records as "Model" and all Diameters as "GIS". To force the assignment of a status code, the lower two boxes in the "Overall assignment" screen need to be ticked on, and the desired status code value selected from the drop-down list.
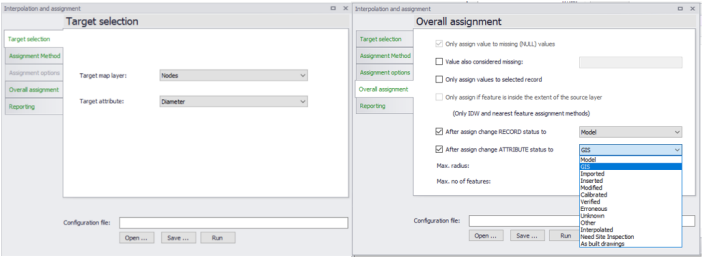
Figure: Using the assignment tool for setting the flags
Other Means of Setting Flags
Flags can also be assigned by direct manual editing in the data tables. The values can be either typed directly into the Status field for each record or selected from a drop-down list. The Field Calculator can be used for flagging multiple records at a time. The entered values are automatically validated to ensure that they correspond to those available in the list of status codes.
Using the Flags
Flags are useful for finding, selecting, filtering, categorizing, reporting, processing and general tracking of model features and data quality.
Using status codes for feature selection is demonstrated in the figure below. Note that only code values are visible in this dialog. Click on "Get Unique Values" to generate a list of all available status codes to use in the selection expression.
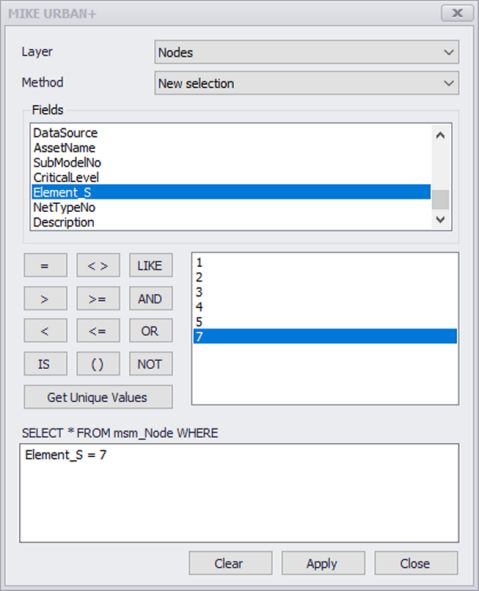
Figure: Selection by attribute
The flags are also very useful for visually displaying data quality information. For example, highlight areas with a low confidence in data quality. The symbology can be customised to assign different symbols and colours as shown in the figure below. In this way it is easy to provide both an overview and at the same time highlight important features.
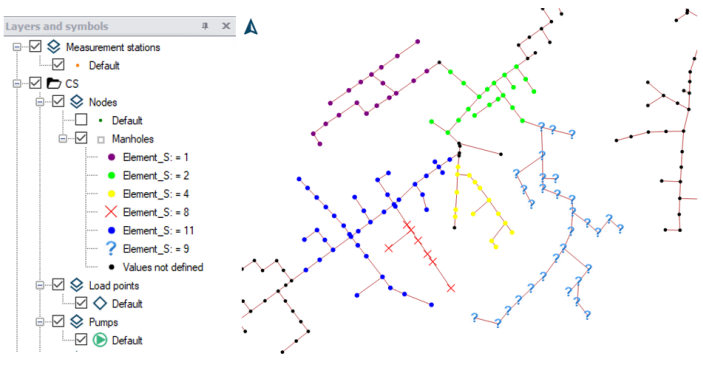
Figure: Utilizing symbology to display flags