Management of MIKE+ Catchments
MIKE+ catchments are geographical polygon features representing hydrological urban catchments or wastewater drainage areas. As such, MIKE+ catchments may be used for hydrological modelling or as wastewater sources for MIKE+ Collection System models. Furthermore, MIKE+ catchments may be used in various analyses, independently of any computational model.
MIKE+ catchments are initially independent of any network. It is only after definition of catchment connections to a model network that the catchments become a source of loads for a network model.
MIKE+ catchments can be managed both graphically on the Map and through the Catchments Editor. The two modes complement each other. Joint application of both modes allows for efficient and complete management of catchment data.
The graphical mode allows digitization of catchment extent by tools like ‘Create, ‘Edit’, ‘Delete’, ‘Split’, ‘Append catchment’, ‘Clip catchment’, and ‘Erase catchment’. These tools are accessed via the Catchments ribbon as well as the Map. The graphical mode comes short of specifying catchment attributes.

Figure: The Catchments ribbon
The Catchment Editor is used for:
- Editing catchment attributes. It is also possible to insert catchments through the Editor; these are given a Default quadratic shape.
- Editing connections to model networks and hydrological data for hydrological models.
Consult MIKE+ Collection System User Guide for more details on the Catchments Editor.
The Catchments Editor can be accessed via Catchments Catchments.
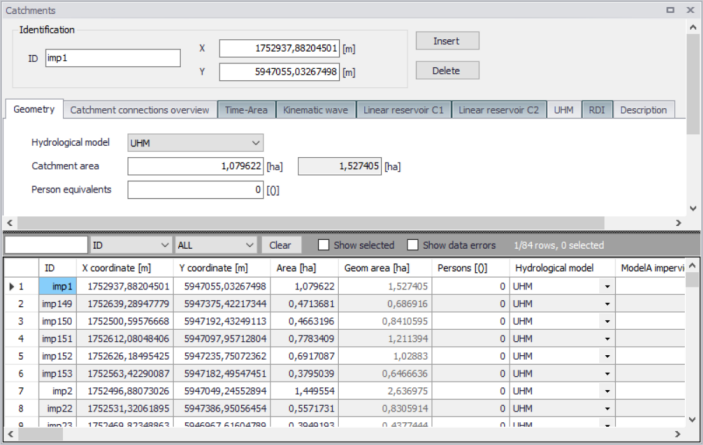
Figure: The Catchments editor
Finally, there are also tools for automated delineation, connection and hydrological parameter estimation for stormwater catchments. These tools include fast ways to generate reasonably good input to hydrological models, which can then be modified in the Editors as needed.
Calculated vs User Specified Values
Calculated vs. User Specified Values
The system automatically provides values for a number of geographical catchment properties (e.g. centerpoint coordinates, Catchment area). Optionally, ‘Catchment area’ values may be specified by the user in the Catchments Editor. If present, user-specified values replace program-computed values in model calculations.
Tools for Graphical Catchment Editing
The various tools for graphical catchment editing can be accessed through the Catchments ribbon or through the ‘Layer editing tools’ toolbar on the Map.

Figure: The ‘Edit features’ options on the Catchments ribbon
Activate ‘Catchments’ on the ‘Layer editing tools’ toolbar to graphically edit the catchment layer.

Figure: The ‘Layer editing tools’ toolbar ready for editing catchments
All tools for graphical editing are fully supported by Undo/Redo functions.
Create Catchment Feature
The ‘Create’ function allows for digitization of perimeters of detached or overlapping catchment polygons. Adjacent catchments can be more precisely digitized using the ’Append catchment’ tool, or by splitting an existing catchment into two parts using the ‘Split’ option.
During catchment creation, the cursor appears as crosshairs. The polygon is digitized by clicking along the wanted catchment perimeter. Right-clicking removes the last vertex added. A double-click completes the current digitization process and the system is immediately ready for the next catchment.
Snapping is available during catchment creation. This allows automatic detection of vertices or edges of nearby shapes if the cursor is within snapping tolerance of existing elements, allowing for inserted points to be created at snapping point locations.
Deactivate the tool by deselecting the tool from the ribbon or by selecting another tool from the ribbon.
Each new catchment polygon is added as a new record in the catchments attribute table. By Default, a name (i.e. identifier) is given as ’Catchment_n’, where ’n’ stands for internal catchment index. The default identifier should normally be changed into some meaningful name.
Edit Catchment Feature
This tool allows for editing existing catchment polygons. When activated, the tool brings a catchment into the editing mode on a mouse click inside the catchment. The catchment turns dark blue and the polygon vertices are highlighted.
Individual vertices can be clicked-on and dragged to a wanted position. The existing vertices can be deleted or new vertices can be inserted, as needed.
Left click on an edge to add a vertex. Double left-click on a vertex to delete it.
Deleting a vertex connects the two closest adjacent vertices along the catchment perimeter by a straight line. Inserting a point inserts a vertex at the closest point on the catchment perimeter. The new vertex can subsequently be dragged to the wanted position.
By clicking the mouse outside the catchment, the editing session is completed (the catchment turns back to original color), and the system is ready for editing another catchment.
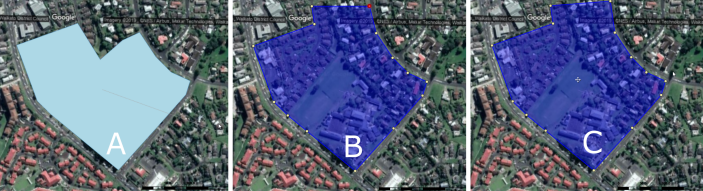
Figure: The original catchment polygon (A); Edited polygon (blue) with highlighted vertices; Catchment after completed editing (C).
Move Catchment
An individual catchment polygon can be moved (translated) to a new position. Crosshairs appear at the polygon centroid when the catchment feature is selected for editing. Click on the crosshairs and move the feature to a desired location.
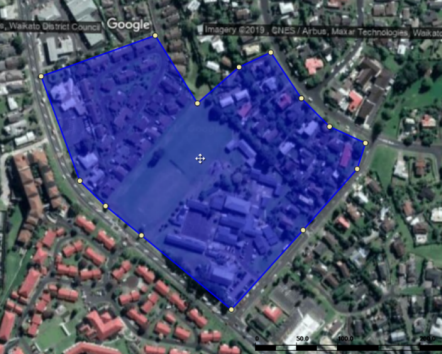
Figure: Use the crosshairs at the polygon centroid to move the feature during editing
Delete Catchment
Activate the ‘Delete’ tool from the Catchments ribbon, and then select a feature on the map to delete it.
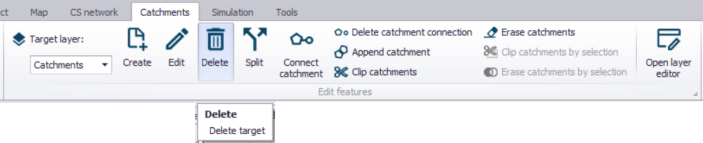
Figure: The ‘Delete’ tool on the Catchments ribbon
Split Catchment
An existing catchment polygon can be split into two adjacent catchment polygons. The digitization of the split line is started by a mouse click. The first click MUST be outside the polygon to be split. The line is drawn with subsequent clicks until the catchment perimeter is crossed. A double-click outside the polygon (typically on the opposite side) ends the splitting process.
The catchment connection (if any) for the original catchment is kept for the new catchments after a split.
After a split, the system deletes the original catchment record and inserts two new catchment records. The automatically provided identifiers (i.e. _copyn) of the new catchments would normally be changed into some meaningful catchment names.
The imperviousness for the new catchments is copied from the original catchment, while Catchment area and Person equivalents from the original catchment are divided proportionally between the split catchments.
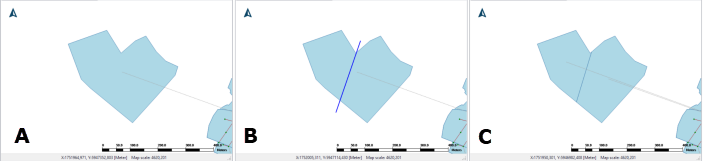
Figure: The splitting process starts with an existing catchment (A); The split line is drawn along the wanted path (B). The split action is initiated by a double click. The original catchment is split into two adjacent catchments.
Append Catchment
A new catchment can be appended to existing catchment(s). The result of this action is identical as with the ’Create’ tool, except that part of the catchment perimeter coincides with the perimeter of the adjacent catchment(s).
The digitization of the new catchment is started by a mouse click. The first click MUST be inside an existing polygon. The catchment perimeter is drawn with subsequent clicks. A double-click inside any of the existing polygons ends the append process.
Note
The new catchment is created based on the digitized perimeter and between the first and last mouse clicks. Hence, if the existing edge (where the catchment is appended) is jagged, care should be taken to digitize the new catchment so it covers the whole area to avoid any gaps between the new catchment and the existing ones.
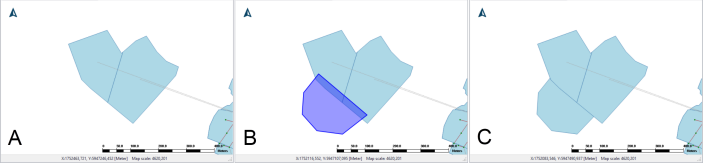
Figure: Existing catchment polygons (A); Digitization starts and ends INSIDE an existing polygon (B); A new catchment is appended (C).
The automatically provided identifier for the appended feature should be changed into some meaningful catchment name.
Clip Catchments
Existing catchment features may be reshaped using the ‘Clip catchments’ tool.
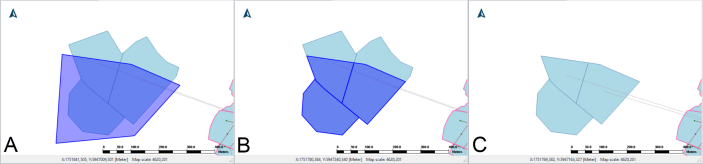
Figure: Define a clipping polygon on the map (Blue area in A); Areas under the clipping polygon intersecting existing catchment features are highlighted (B); Areas outside the clipping polygon are removed (C).
Activate the tool from the Catchments ribbon. Define a clipping polygon on the map, (left) clicking along the desired perimeter on the map and ending the polygon definition with a double-click. The area under the clipping polygon that intersects existing catchment features are retained.
Erase Catchments
Use the ‘Erase catchments’ tool to reshape catchment features. Similar to the Clip tool, define a polygon on the map--(left) clicking on the map and ending the polygon definition with a double-click. The area under the defined polygon that intersects with existing catchment features are removed.
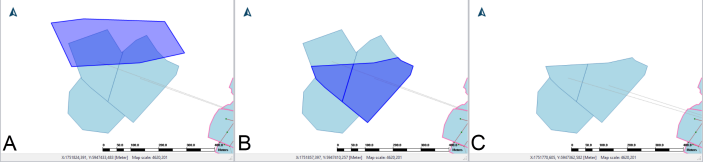
Figure: Define a polygon on the map (Blue area in A); Areas outside the polygon intersecting existing catchment features are highlighted (B); Areas inside the polygon are removed (C).