Animations
After having loaded result items into the project and plotted dynamic items on a map (see chapter Displaying Results on a Map), on a profile plot or on a cross-section plot, it is possible to animate results. All result plots are synchronized, i.e. they show the same date and time. To animate results, go to the 'Results' ribbon and use the tools available in the 'Animation' toolbox:
- Start: plays the animation.
- Step forward: moves to the next time step
- Step backward: moves to the previous time step
- Faster: speeds up the animation, when automatically animating the results using the 'Start' button
- Slower: slows down the animation, when automatically animating the results using the 'Start' button
- Go to beginning: moves to the first time step
- Go to end: moves to the last time step
- Track bar: move the cursor to quickly change the time step
- List: expand the list to see all date and times and pick a new time step.

Figure: Animate dynamic results using tools from the Animation toolbox on the Results ribbon
The date and time of the results can also be changed by clicking in a time series plot: the selected date and time in the plot will be used for the animation in the other results views.
When multiple result files are loaded on the map, they may have different time spans and different storing frequencies (i.e. different time steps). Therefore, it is not possible to display results from all result files at the exact same date and times. So, the following approach applies:
- The time step of the animation is the smallest time step from all result files loaded on the map
- At a selected date and time of the animation, if a result file does not have data at this exact date and time, then the nearest date and time (which can be either before or after the selected date and time) is shown.
A video file of the result animation may be generated and saved using the ‘Save to AVI’ tool. On the ‘Save animation to AVI file’ dialog, one may specify:
- Target map. Whether to record the video with a result map or the model map.
- The starting and ending time steps for the recording. This allows for recording only part of available results.
- The file name of the video to be generated, and its compression quality.
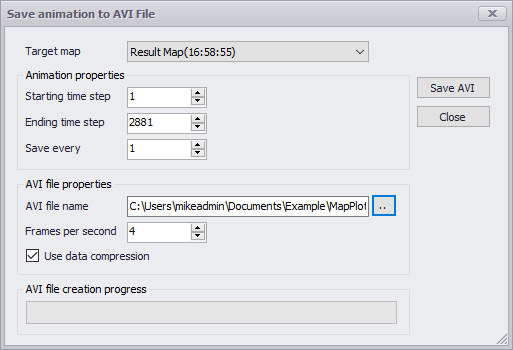
Figure: Setting the properties for saving the animation into a video file