Versions Management
Principles and Definitions
The Versions Management tool is designed to support a cost-effective model maintenance. The tool can identify, report and visualize differences between any two versions of a model setup, as well as it can automatically update any model with the identified differences. Additionally, the Versions Management tool facilitates the organization of various model versions into a tree-like dependency structure that reflects the actual models' mutual relations and evolution.
As such, this labor-saving tool can be used for a variety of tasks and operations in the model's life cycle:
- Managing model versions and instances: The versions Management tool allows for the creation and maintenance of the models "Version tree", as a structured format for keeping track of various model versions dependencies and evolution. Modelers typically develop and maintain several versions of models representing the modelled system. The model versions may differ by the level of modelling detail, by the functionality, by geographical extent, etc. All these versions have in common the fact that they are built on the data from the same source and that they describe the same system.
Each of the model versions may contain several instances. Instances are "versions of versions", typically reflecting certain model version at different times, e.g. non-updated and updated instance of the same model version.
Dependencies and evolution of model versions and instances is represented by the "version tree" with the "master version" in the root and other versions emanating from the root as "children" or "grandchildren". Position of any model version in the version tree defines its origin and relation to its predecessor ("parent") or successors ("children").
The version tree may be established ad-hoc by a modeler, as a helping structure to keep the models organized. Or, it can be created, maintained and strictly controlled by the corporate model administrator, authorized to release the models for editing, to append new versions and to perform updates. - Identifying, reporting and visualizing changes in the asset data system that is used as a source of model data: This is relevant when the model data are maintained outside the MIKE+ model e.g. in an asset database. The data in the asset database are kept up to date with the changes in the actual system by adding new data records, by editing already existing data and by deleting obsolete data. Documenting these changes by importing the relevant data from the asset database into MIKE+ with the 'Import and export' tool at regular intervals and analyzing the differences between the current and any previous imported data set, helps to keep track of the database updates and provides QA feedback for the updating process.
- Applying the identified data changes in the asset database for update of any model version developed from the asset data and documenting the updates: Working MIKE+ models are frequently created by importing the relevant data from asset database into MIKE+ and subsequently performing "manual" data modifications as appropriate. Such modifications can include addition of data not available in the asset database, supplementing the missing attribute values, reconfiguration of complex structures, removal of small pipes or an area which is outside the area of interest, etc. This is a time-consuming process that requires a solid expert know-how. If these models are to maintain their value, they must be kept up to date with the changes in the actual system they represent, i.e. with the changes in the asset database. A manual updating process is costly and complicated, which frequently results in models that are outdated and as such not representative for the current system. The version management tool automates the updating process by analyzing the differences between the previous and the current version of the asset database (actually, between the previous and the current imported data set) and applying these differences to the working model. The tool identifies and resolves possible conflicts on individual data record level by letting the modeler to accept or reject the data update.
- Applying the identified data changes in any MIKE+ model setup for update of any other model version and documenting the updates: Various MIKE+ model versions are typically created by making a copy (a "child") of an existing model version and editing the copied MIKE+ database. A new version may have a different purpose and functionality, but essentially it represents the same system as its "parent" model version with the bulk of same data. When a "parent" model is edited or updated (e.g. by applying the updates from the asset database), these updates must also be applied to any "child" models as well, to preserve consistency. This can be achieved in the same way as the previous task (updating of a MIKE+ model from the asset database), with only difference that the differences are analyzed for the current and previous instance of the "parent" model and then applied to a new instance of the "Child" model.
- Identifying, reporting and visualizing differences between any two model setup versions or instances: Different MIKE+ model versions and instances may arise as a consequence of a continued modelling process. It is often relevant to identify and document the differences between two MIKE+ databases. For example, comparing today's and yesterday's instance of a MIKE+ database, provides documentation for the model editing performed during the time interval that separates their date & time. Similarly, comparing a basic version of a model with its extended version that includes control rules provides a documentation on the control data that have been added to the controlled version.
Note
Operation of the Versions Management tool relies on unchanged data identifiers. Renaming the data records (i.e. changing their IDs) either in the asset data system or in any MIKE+ model version breaks definitely the links between the corresponding data and prevents correct functionality of the versions management tool.
In the following chapters, the definitions below are used:
- Asset data system: this is the original source of model data, before they are imported into MIKE+. It usually includes a main asset database, plus some supplementary data sources in various formats. The asset data are maintained continuously to represent the current physical system in the best possible way. It is this continuous evolution of the asset data that needs to be included in the existing models.
- Master database: this is the main MIKE+ database, obtained after importing the data from the asset data system. It is usually not a working model used to run simulations. When an updated version of the asset data system is available, a new master database can be created by importing the latest asset data in a new MIKE+ database, using the 'Import and export' tool.
- Model version: in this context, a model version is a modified version of the master database or any other MIKE+ model version. Multiple model versions may exist, each tailored to a specific purpose.
- Model instance: an instance represents a master database or any model version database at a given point in time. The master database and model versions usually have multiple instances, each instance reflecting the asset or model data at a specific date. When a model database is to be updated, its former instance is kept unchanged, and a new instance is created with the updates. New instances of the master database are created by repeating the import from the asset data system. New instances of model versions can be created automatically using the Versions Management tool.
The core purpose of the Versions Management tool is to create a new (updated) instance of a model version, by finding and applying the latest updates from the master database.
Note
The Versions Management tool is designed to work with the Base scenario only. Differences that may arise in other scenarios are not identified and reported. Updates are performed on the data in Base scenario only, and their propagation to other scenarios is controlled by the functionality of Scenario Manager.
Model versions and instances management
The 'Versions management' tool is accessible from the ribbon, in the 'Tools' tab. It can be used even if no model database is opened.
Its main window allows organizing the different model versions as well as their instances.
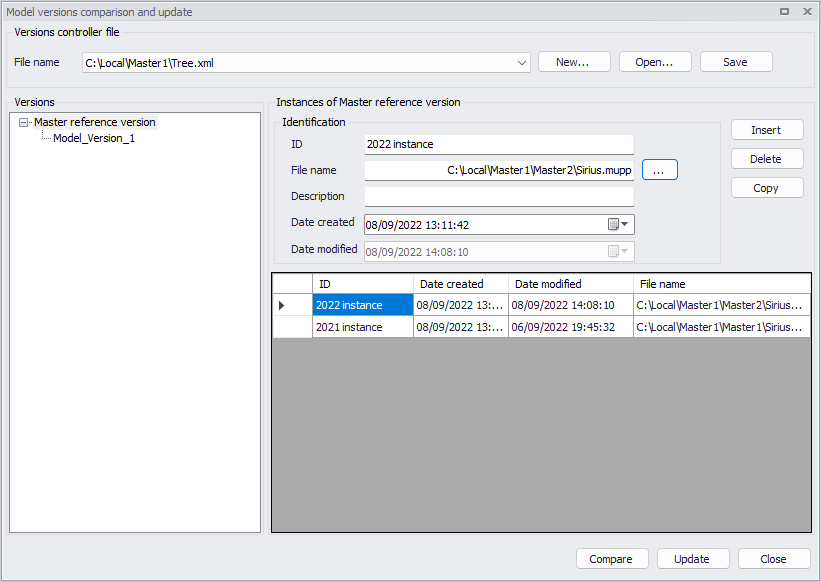
Figure: The main window of the 'Versions management' tool
Versions controller file
At the top of the window, a .xml file must be selected. This file stores all data defined in this window, related to model versions and instances. It is possible to work with several files, in case multiple sets of model versions should be used one after the other.
Recently-used files can be selected from the drop-down list. The buttons to the right are also used to manage this file:
- New: creates a new file. When a new file is created, the user is asked to select an existing master model database. The versions tree will then initially contain only this master database with a single instance, and other model databases will have to be inserted manually afterwards.
- Open: opens an existing file to show its list of model versions and instances.
- Save: saves the changes to the list of model versions and instances to the file.
Versions
The left-hand side of the window contains a tree view representing the hierarchy between the various model versions and their master database.
The first version at the root of the tree is always the master model database. Any number of versions can be added to the tree, and each version can have its own "sub-versions".
Several options are available in the context menu (right-click on a selected item in the tree):
- Create new child: inserts a new child below the selected item. Two options are available:
- Create the new child as a copy of the last instance of its parent. After selecting this option, the user is asked to provide a location and file name for the new child's model database.
- Associate the new child to an existing model database. After selecting this option, the user is asked to select the existing model database.
- Rename: renames the model version in the tree view.
- Delete: removes the selected item from the tree and all its children versions. It does not delete the associated MIKE+ model files.
- Compare: opens the tool to report differences with another model version.
- Update: opens the tool to update the model version using previous instances and updates to the master database.
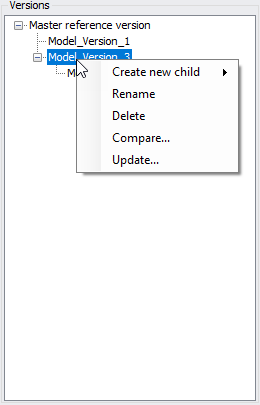
Figure: The tree view to manage model versions and their hierarchy
Instances
The right-hand side of the window contains a list of instances for the selected version in the tree, shown in the lower table. Each model version must contain at least one instance, and each instance is associated to a MIKE+ model database.
The following details are shown above the table for the selected instance:
- ID: the identification text of the instance.
- File name: the path to the corresponding MIKE+ model setup. It can be selected using the '…' button to the right.
- Description: an optional descriptive text.
- Date created: the date of creation of the instance. It can e.g. be used to sort the instances chronologically in the table.
- Date modified: the date at which the selected .mupp file was last saved.
The following buttons can be used to manage instances:
- Insert: creates a new and empty instance in the list. The corresponding model database must be selected manually afterwards. This option should be used when the model database for the instance already exists.
- Copy: creates a new instance in the list, being a copy of the selected instance in the table. The new created instance can then be modified manually. When using this button, the user is asked to provide a location and file name for the new instance's model database.
- Delete: removes the selected instance from the list. Note that the corresponding MIKE+ model database is not deleted.
Note
After running the 'Update' tool, a new instance is automatically inserted and associated to the created model database.
Compare tool
The 'Compare' tool is either opened from the 'Compare' button in the main window, or from the context menu of the tree view.
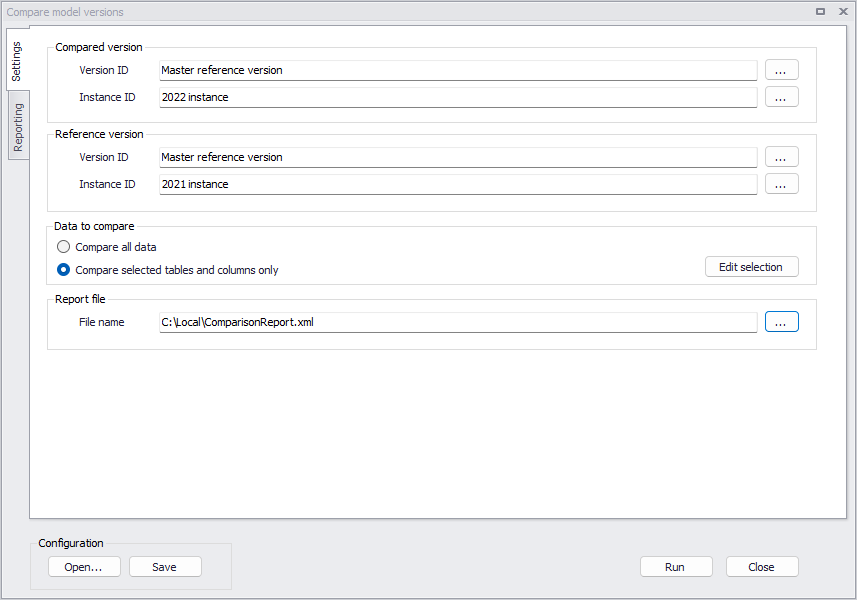
Figure: Comparing two model versions
The purpose of versions comparison is to identify differences between two data sets. Differences are listed in a report and can be shown on the map. The comparison tool does not perform any change to the model databases.
The differences are categorized as:
- Added: data records that are present in the compared version, but do not exist in the reference version.
- Updated: data records that are common to both versions but have at least one attribute value or geometry that is different.
- Deleted: data records that do not exist in the compared version, but are present in the reference version.
Settings
Before running the comparison, the two model versions must be selected: the compared version and the reference version; and for each of them the instance to be used must also be selected.
Under 'Data to compare', two options are available to control the scope of the comparison:
- When selecting 'Compare all data', the comparison tool compares all database tables, and all columns in these tables.
- When selecting 'Compare selected tables and columns only', the comparison tool compares only the tables and columns selected from the 'Edit selection' button. This option can avoid reporting differences of no interest, when they are related to data types not (or no longer) used in the project, or when users consider that changes in some columns are not relevant for the comparison.
When the latter option is used, a selection window shows up, with a default list of tables to compare. Tables can be added or removed using the 'Add' and 'Remove' buttons on the right. For each table in the list, the table's name can be edited from a drop-down menu or by typing the table name. Each table can be expanded to access:
- The list of columns in the specific table: from this list, it is possible to tick only the columns which should be compared, while the others should remain unselected. All columns from the selected table are listed, except the MUID column which is always compared and used as comparison key between the two model databases.
- A filter expression: when this filter is active, an expression must be defined in the second column. Clicking the expression field (in the second column) will automatically open the Expression Editor, where the expression used as filter can be entered using the available variables or functions. Only the records fulfilling the specified expression, in both the reference and compared versions, will be compared. This filter can be used, for instance, to compare a limited geographical area (filtering nodes by coordinates) or filtering records with specific IDs, etc. Note that the filter only applies to items existing in both the reference and the compared versions, therefore all items added or deleted in the compared version will be listed in the report even if they don't fulfill the expression.
The 'Save' button on the right allows saving the configuration of this selection (saving the list of included tables, columns and filter expressions), for later re-use in future comparisons. The 'Load' button is then used to load this configuration file.
During the comparison process, if the option 'Compare selected tables and columns only' is active, the tool will only compare and report differences for tables which are selected in this window, and for columns also selected and fulfilling the filter, if any.
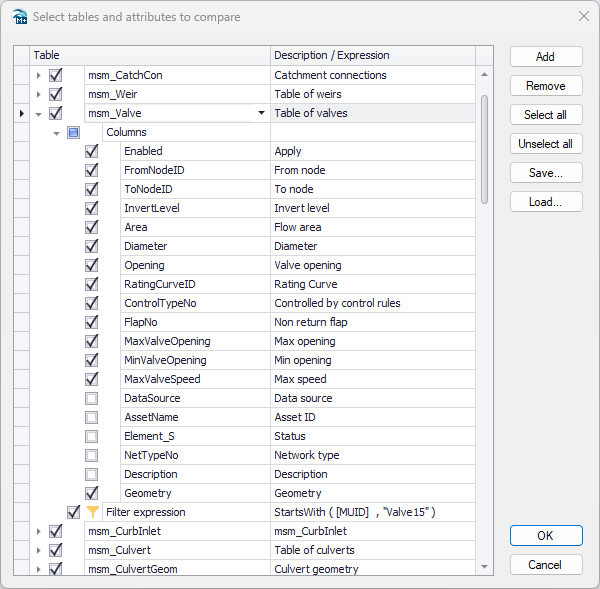
Figure: Specifying tables and columns to compare and filter expressions
The tool compares records based on their unique ID, therefore the item IDs should ideally not be changed between the two compared databases in order to produce a relevant report. If an item has been renamed in the compared version, the original item (with original ID) from the reference database will be reported as deleted, whereas the new item (renamed) from the compared database will be reported as added, even if they are identical otherwise.
The path to the report file must also be specified. This report will automatically show up in the 'Reporting' tab once the comparison is completed.
Reporting
When the comparison is executed, the report appears in the 'Reporting' tab. For all compared tables, it will list the differences:
- Added records are highlighted in green.
- Updated records are highlighted in yellow. Updated columns are also highlighted in yellow (if the option 'Compare selected tables and columns only' is active, only the value of the compared columns is reported).
- Deleted records are highlighted in red.
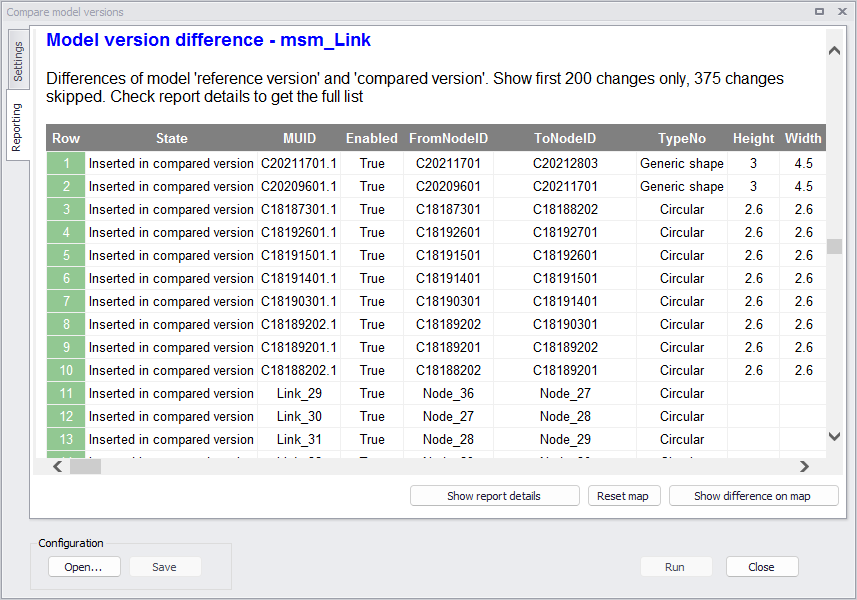
Figure: Reporting differences between two model versions
This report will show a maximum of 200 differences per table. Pressing 'Show report details' will open another window with the full list of reported differences and with additional options to export the report to other formats.
Info
After closing the tool, it is possible to re-open the .xml report file from the 'Model and result report' tool available in the ribbon (select the file from the 'View' tab).
Pressing the button 'Show difference on map' will highlight on the map the modified items, with the same color code. Note that this requires that the compared model version is opened in MIKE+ beforehand.
The button 'Reset map' will clear these highlights on the map.
Buttons
Use the 'Save' button to save configuration settings in *.xml format for later reuse or in another model.
The 'Open' button loads a previously saved configuration file.
Once your configuration is complete, run the tool using the 'Run' button to create your couplings.
Note
If one of the two compared databases contains a network simplified using the 'Network simplification' tool, the comparison can take into account the simplification information, in order to e.g. report pipes as "Merged" instead of "Deleted". This requires that the model database with the simplified network, which stores simplification information (relationships between IDs of original and merged pipes), is opened when the 'Compare' tool is executed. It also requires, if the option 'Compare selected tables and columns only' is active, that both nodes and links tables are included in the comparison with all their columns.
Update tool
The 'Update' tool is either opened from the 'Update' button in the main window, or from the context menu of the tree view.
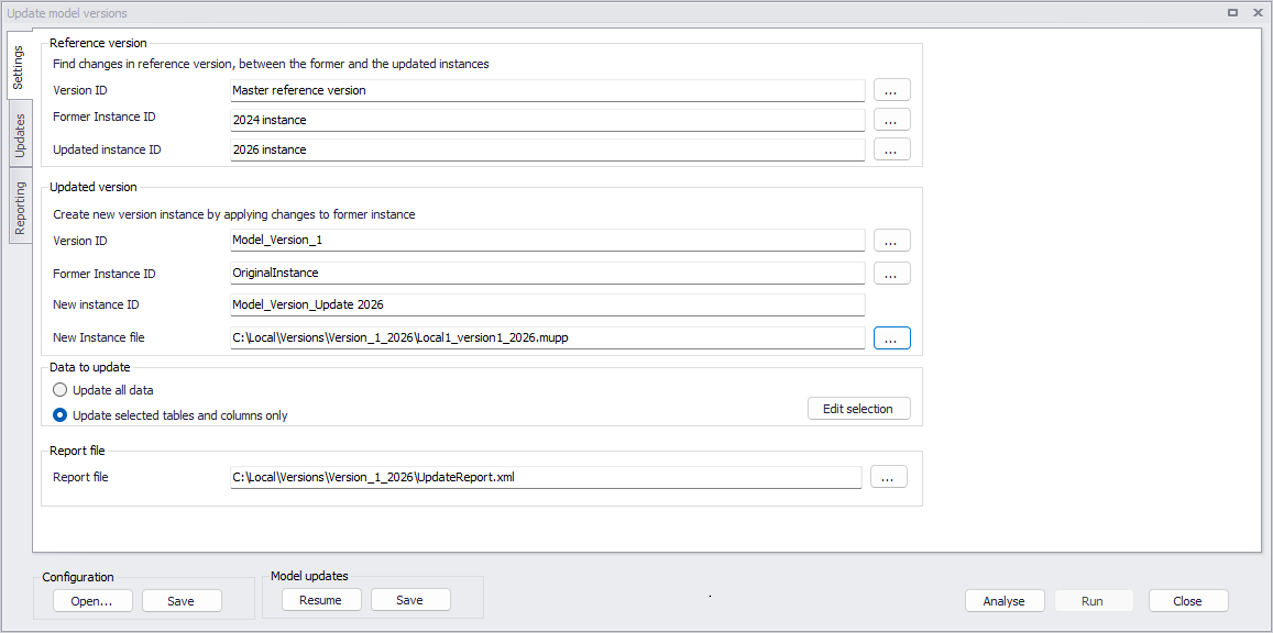
Figure: Creating an updated instance of a model version
The purpose of versions updating is to identify updates (differences) between two data sets (typically two instances of the master database) and then apply these updates to a model version. This creates a new instance of the model version.
The update is performed in successive steps:
-
Identify updates, by finding differences between two different instances of a reference version (e.g. two instances of a master database).
-
Identify changes to the model version to be updated, compared to the former reference version it was created from.
-
Compare the updates with the changes made to the model version. For the different types of combination of changes, different actions may be applied.
-
List all updates. For each of them, the user can decide which action to perform.
-
Update the model version in a new instance, using the selected actions.
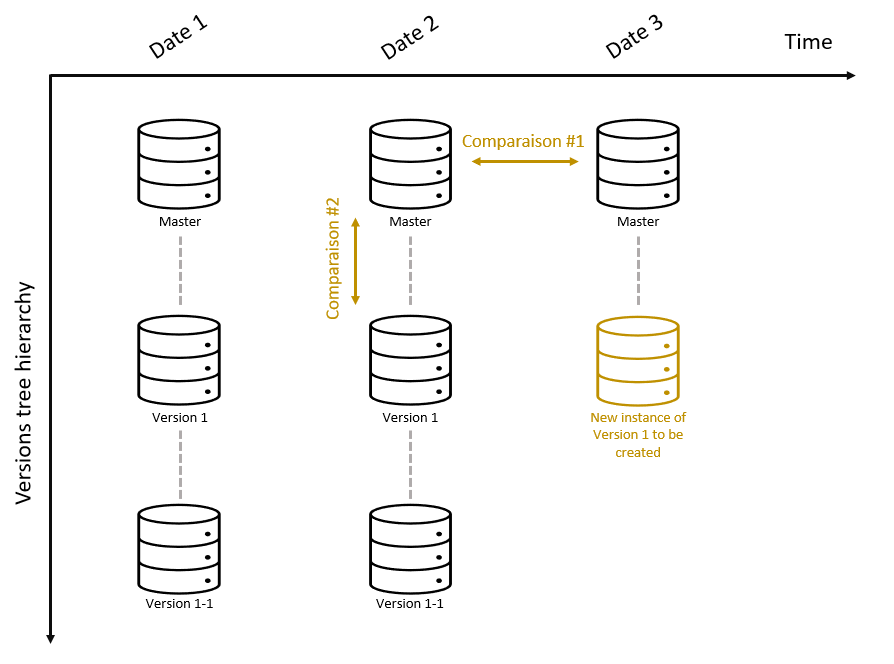
Figure: Creating a new instance of a model version using previous instances and updates to the master database
Settings
In the Settings tab, three input model databases must be selected:
- The two instances of the reference version (typically the latest and the former instances of the master database). They are selected in the 'Reference version' group.
- The former instance of the model version, which is to be updated. It is selected in the 'Updated version' group.
Besides, a path to an output model version must be specified in the 'New instance file'. This is the updated instance which will be created by the tool for the updated model version. A 'New instance ID' is also required: this is the ID which will be shown in the list of instances, in the main window.
Under 'Data to update', two options are available to control the scope of the update:
- When selecting 'Update all data', the update tool compares and updates all database tables and all columns in these tables.
- When selecting 'Update selected tables and columns only', the update tool compares and updates only the tables and columns selected from the 'Edit selection' button. This option can avoid identifying differences of no interest, when they are related to data types not (or no longer) used in the project, or when users consider that changes in some columns are not relevant for the comparison.
When the latter option is used, a selection window shows up, with a default list of tables to compare. Tables can be added or removed using the 'Add' and 'Remove' buttons on the right. For each table in the list, the table's name can be edited from a drop-down menu or by typing the table name. Each table can be expanded to access:
- The list of columns in the specific table: from this list, it is possible to tick only the columns which should be compared and updated, while the others should remain unselected. All columns from the selected table are listed, except the MUID column which is always compared and used as comparison key between the different model databases.
- A filter expression: when this filter is active, an expression must be defined in the second column. Clicking the expression field (in the second column) will automatically open the Expression Editor, where the expression used as filter can be entered using the available variables or functions. Only the records fulfilling the specified expression, in both the reference and compared versions, will be compared and updated. This filter can be used, for instance, to compare a limited geographical area (filtering nodes by coordinates) or filtering records with specific IDs, etc. Note that the filter only applies to items existing in all model versions, therefore all items marked as 'added' or 'deleted' will be listed in the report even if they don't fulfill the expression.
The 'Save' button on the right allows saving the configuration of this selection (saving the list of included tables, columns and filter expressions), for later re-use in future comparisons. The 'Load' button is then used to load this configuration file.
During the update process, if the option 'Compare selected tables and columns only' is active, the tool will only compare, update and report differences for tables which are selected in this window, and for columns also selected and fulfilling the filter, if any. Tables and columns which are not selected will be kept unchanged (same as in the former model version being updated).
Figure: Specifying tables and columns to compare and filter expressions
Finally, the path to the report file must also be specified. This report will automatically show up in the 'Reporting' tab once the update is completed.
When settings are correctly configured, pressing the 'Analyse' button will analyse the input databases and list all the updates in the 'Updates' tab.
Updates
The table in the 'Updates' tab shows all updates which are about to be applied to the former model version, in order to create the new model version. For these updates, multiple actions are possible. This table should therefore be reviewed carefully and the action for each update should be modified as necessary.
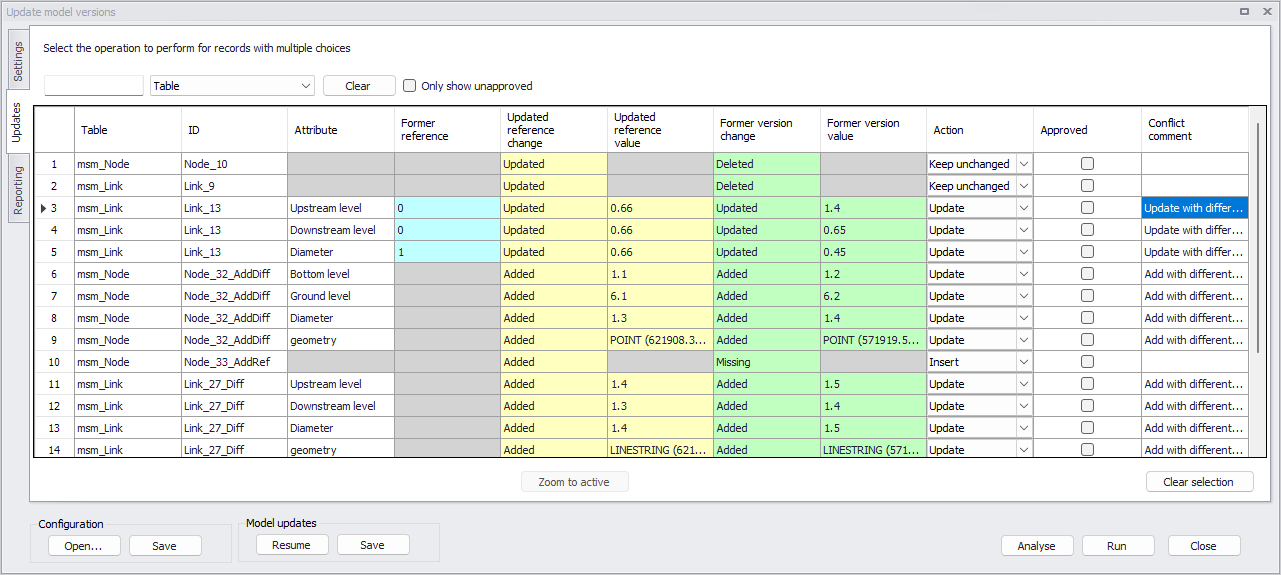
Figure: The list of identified updates
The table of updates contains the following columns:
- Table: the name of the database table containing the item
- ID: the MUID of the compared item
- Attribute: when an item is added or updated in both the new reference version and the model version but with different attribute values, this column lists all the attributes with different values
- Former reference: the value of the attribute in the former reference version, shown when it has been updated in the new reference
- Updated reference change: it shows the changes in the updated instance of the reference version, compared to the former reference:
- Updated: data records that are common to both instances but have at least one attribute value or geometry that is different.
- Added: data records that are present in the updated instance, but do not exist in the former instance.
- Deleted: data records that do not exist in the updated instance, but are present in the former instance.
- Updated reference value: the value of the attributes in the updated instance of the reference version. This is shown only when the update is handled for individual attributes (not when e.g. the entire item with all its attributes is to be updated or deleted).
- Former version change: it shows the changes in the version to be updated compared to the former reference version:
- Added
- Deleted
- Updated
- Missing
- Unchanged
- Former version value: the value of the attributes in the model version to be updated. This is shown only when the update is handled for individual attributes (not when e.g. the entire item with all its attributes is to be updated or deleted).
- Action: this shows the selected action to be applied for each record. Depending on the changes identified in the reference version and in the model version, the possible actions are:
- Update
- Insert
- Delete
- Keep unchanged (remains identical to the previous instance of the model version being updated)
- Approved: an optional check box which can be used to track the progress of the reviewed and approved actions. It has no effect on the actual update process, i.e. all actions from the table will be applied to the created new model version even if all records are not approved.
- Comment: optional description of the update.
The different cases which can be encountered are listed in the following table.

Table: The list of cases and their possible actions
To help searching for specific updates, it is possible to apply a filter in the search field above the table, where the search applies to the column also selected above the table. Alternatively, it is possible to select updates by attributes, by right-clicking on a column's header to enable the 'Select by attributes' tool, or to load a selection from the Selection Manager from the opened project (only available if a MIKE+ database is currently opened). Use the 'Clear selection' button to clear the selection.
It is also possible to assign the same action to all the selected updates, using the Field Calculator on the 'Action' column.
Once your configuration is complete, run the tool using the 'Run' button to create the new updated instance.
Mergers
The 'Mergers' tab will show up if the tool detects that the updated database contains a network with pipes merged using the 'Network simplification' tool. This tab is similar to the 'Updates' tab, and allows controlling possible actions for the parts of the network that have been merged.
This requires that the model version with the merged pipes, which stores simplification information (relationships between IDs of original and merged pipes), is opened when the 'Update' tool is executed. It also requires, if the option 'Update selected tables and columns only' is active, that both nodes and links tables are included in the update selection with all their columns.
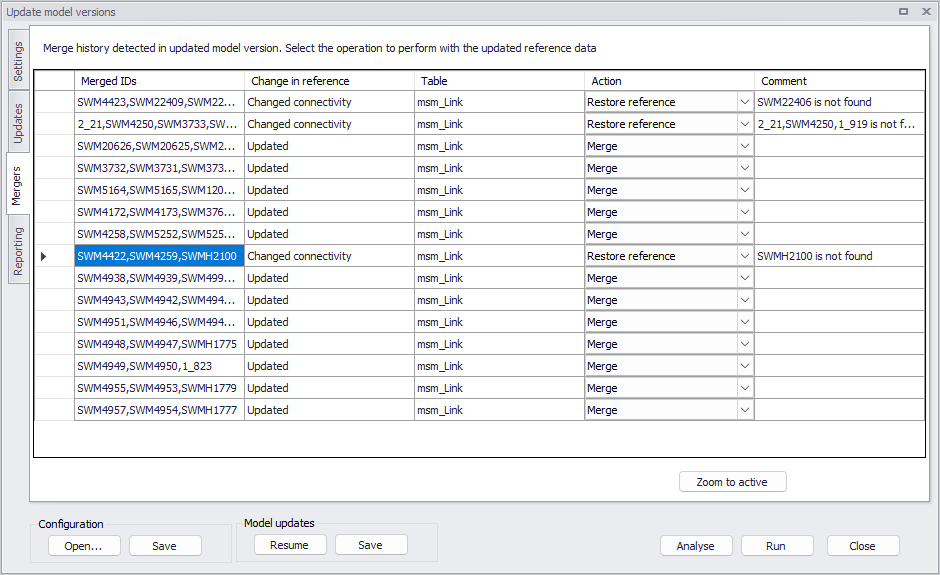
Figure: The list of identified mergers
Depending on the changes identified in the reference versions and in the model version, the possible actions are:
- Merge: this performs the "merge" operation, using updated attributes and geometry of the pipes as available in the updated reference version.
- Keep unchanged: this keeps the merged pipe, from the former model version being updated, unchanged.
- Restore reference: this removes the merged pipe and replaces it with the original pipes and nodes from the updated reference version. These original pipes won't be merged.
When the changes in reference versions include changes to the connectivity between pipes and nodes, it may require a visual review and possibly require to manually change merge parameters, so restoring the reference data may be the preferred option because automatic re-merge can in some cases lead to unexpected results. In some cases (e.g. if one of the original pipes being merged cannot be found anymore), it is no longer possible to merge the pipes and the 'Merge' action won't be available in the list.
Reporting
When the update is executed, the report appears in the 'Reporting' tab. For all updated tables, it will list the changes applied to the new instance:
- Added records are highlighted in green.
- Updated records are highlighted in yellow. Updated columns are also highlighted in yellow (if the option 'Update selected tables and columns only' is active, only the value of the selected columns is reported).
- Deleted records are highlighted in red.
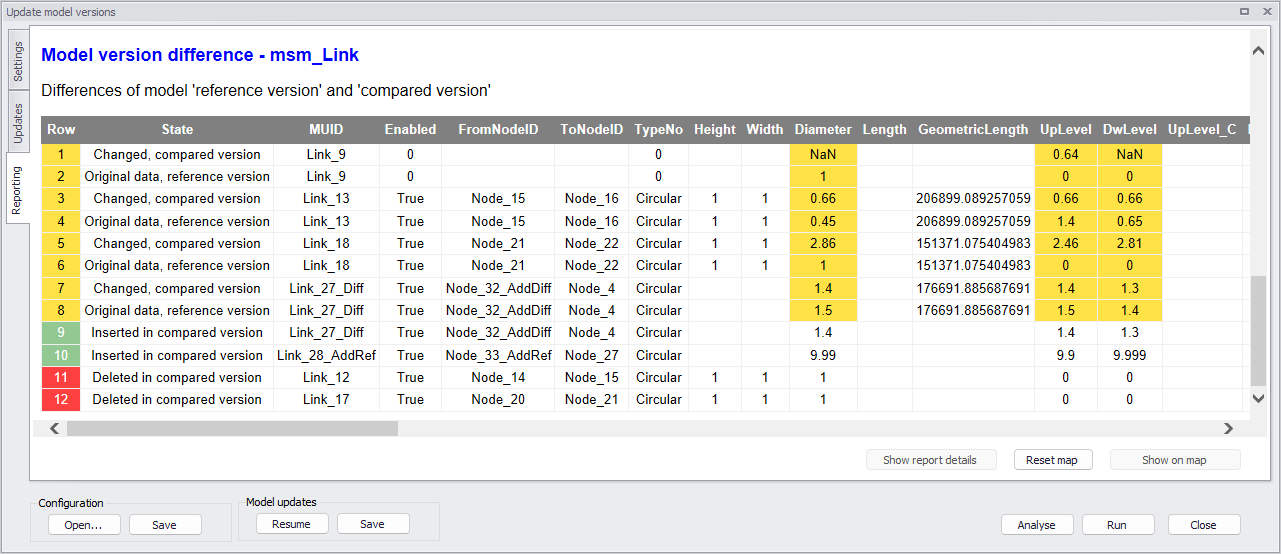
Figure: Reporting changes in the new instance
This report will show a maximum of 200 differences per table. Pressing 'Show report details' will open another window with the full list of reported differences and with additional options to export the report to other formats.
Info
After closing the tool, it is possible to re-open the .xml report file from the 'Model and result report' tool available in the ribbon (select the file from the 'View' tab).
Pressing the button 'Show on map' will highlight on the map the modified items, with the same color code. Note that this requires that the former instance of the updated version is opened in MIKE+ beforehand.
The button 'Reset map' will clear these highlights on the map.
Configuration
Use the 'Save' button from the 'Configuration' group to save configuration settings in *.xml format to reuse later or in another model. This will save all the configuration of the 'Settings' tab.
The 'Open' button loads a previously saved configuration file.
Model updates
Use the 'Save' button from the 'Model updates' group to save your changes to the table of updates in a *.xml file, in order to continue reviewing this list of updates at a later stage. This action actually also saves the configuration of the 'Settings' tab to another *.cfg.xml file.
To later resume the review of the updates, re-open the 'Update' tool and click 'Resume' to select the *.xml file with previously saved changes to the table of updates: this will re-load the databases to compare and run the analysis, and will then load the changes made to the list of updates.