User preferences
The 'User preferences' window includes general options relating to the MIKE+ installation. Most of these settings apply to the MIKE+ installation on the computer and therefore apply to all model setups opened on this installation, unless stated otherwise.
General
Settings available in the 'General' tab include:
- Language: it is possible to choose one of the languages available in the software. See Languages for additional information.
- Use single editor style: when this option is active, only one editor can be shown besides the map: clicking a different menu in the Setup tree view will simply open this editor in the same tab. When this is inactive, an unlimited number of editors can be opened simultaneously: clicking a different menu in the Setup tree view will open this editor in a new tab.
- Show warning on undo buffer clear
- Auto-load result files: when active, this option automatically adds result files to the Results tree view and loads them for visualization in the various results views. Two options are available to control when the result files are loaded:
- At simulation end only: results files are simply loaded once the simulation is completed. This only applies to single simulations, but not to batch simulations nor to simulations executed in detached mode.
- While simulation is running: result files are loaded at regular intervals (every two minutes). This option only supports result file types .res1d, .dfsu, .dfs2, .dfs0. This is primarily designed for long simulations, as it allows viewing and analysing results before the simulation ends. As soon as a result file is loaded, its results can be displayed on maps, time series plots or results tables, and these result windows will automatically refresh when new time steps are loaded, to show the latest results. Note that other types of results presentation windows do not fully support this automatic update of results, and that some functions are disabled while a simulation is running with this regular results loading: automatic animation of results on map with the 'Start' button (but manual selection of time steps from the list or using the track bar remains possible), export of the map to video file using 'Save to AVI' and Result comparison. This does not apply to simulations executed in detached mode.
- Auto-add result layers on map: automatically adds default result layers to the model map after the simulation is completed. This only applies to single runs and if 'Auto-load result files' is also active. It does not apply to batch simulations nor to simulations executed in detached mode.
- Auto restore the project layout when opening a project: when active, this option restores the windows layout i.e. the various windows and their locations as they were when the .mupp project file was saved. When inactive, the default layout is shown when reopening a project.
- Retain exported 2D setup files for simulation: when running a coupled simulation, multiple files are created to execute the simulations and are automatically deleted at the end of the run. Selecting this option will keep the files at the end of the simulation. This setting is saved in the model database, and must therefore be adjusted as necessary for each model setup individually.
- Auto-refresh changes made by others (PostGIS only): when this option is active, MIKE+ continuously checks if changes have been made to the PostGIS database by other users, and refresh the content shown on the screen as necessary. This is only relevant when connecting to a PostGIS database and is irrelevant when working with a .sqlite database. When multiple users work simultaneously on the same PostGIS database, it is therefore recommended that ALL users enable this option in order to see changes made by others, otherwise data shown in the editors may deviate from the actual data saved in the database. If only one user at a time connects to the PostGIS database, it is instead recommended to leave this option unticked to reduce data traffic over the network and improve the performance of the application. See PostGIS database specifics, to read more about multi-user access with PostGIS databases.
- Specifies the number of significant digits in editor and maximum row count per table preview.
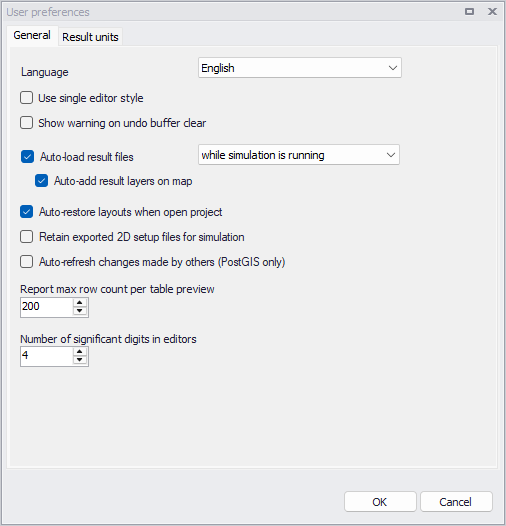
Figure: The general settings in the 'User preferences' editor
Result units
Settings available in the 'Result units' tab are:
- Preferred unit system: this offers a choice between SI and US unit system to be applied by default. The selected unit system will control the unit system proposed per default when creating a new project. It will also control in which unit system results are shown, when no model database is opened :
- MIKE 1D results will be displayed in a unit solely controlled by this preferred unit system
- Water Distribution and SWMM results will be displayed in the unit system in which they were created if it is consistent with the preferred unit system, and will be displayed in the preferred unit system otherwise.
- Custom result units: optional custom units for specific result item types can be specified in the table. Custom units, if any, override the default units controlled by the 'Preferred unit system' and by the project's unit system, to display results in e.g. time series plots, result maps, etc. To insert a new custom unit, the recommended steps are:
- Load any result file containing the result item(s) for which the unit is to be customised
- From the 'User preferences' window, click the 'Info' button next to the custom result units table. This opens a window showing the unit type used for each result item currently loaded in the project. Identify the unit type corresponding to the result item to edit, and close this window.
- Click 'Insert' to add new custom units to the table
- For each custom unit, select the type in the 'Result item type' column: it must match the unit type identified in step 2.
- Select the expected unit in the 'Unit' column, among units available for the selected type.
- Click OK.
- Import / export a result units file: the 'Import' and 'Export' buttons at the bottom of the window allows saving all settings from the 'Result units' tab to a file, and reload the same settings from that file. This may be used to e.g. apply the same settings on multiple computers to use identical units for a common project, or to easily switch units to be used for different projects.
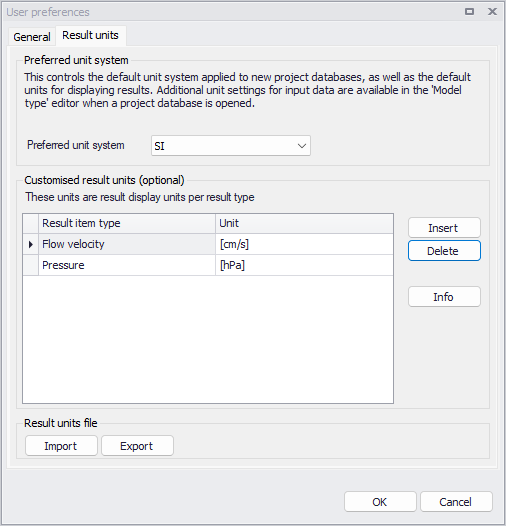
Figure: The units settings in the 'User preferences' editor
Note about result units in profile plots and cross section plots
Custom result units can also apply to results added to profile plots, but this is limited to result items shown on the right axis of the plot. Elevation results (e.g. water level), which are plotted with the left axis, are maintained in [meters] or [feet] regardless of custom units, for consistency with the network geometry. Similary, topography in cross section plots is always displayed in [meters] or [feet] and so is the water level.
Note about model data's units
Above unit settings only control result units and the proposed unit system when creating a new project. Units applied to model setups' attributes saved in the database are however controlled by the unit settings of the project, as described in Selecting an Appropriate Unit Environment.